Here’s two art materials I would have never thought to exist in the same sentence: frisket and pastel. In a recent livestream I received a question about masks and stencils. One of my clever viewers asked if frisket could be used in a pastel drawing.
I had no idea! So I decided to perform a quick experiment.
As a background, frisket is not traditionally used with dry art mediums such as charcoal and pastel. It is reserved typically for thin liquid mediums such as watercolor. Traditional frisket is a liquid latex mixture applied with a brush to paper as a physical barrier. Once the frisket is dried, watercolor, gouache, or ink is applied over it. The color will soak into the paper, but will not absorb into the areas covered by the frisket. After the color layer is dry, frisket can be removed with friction to reveal the original color of the paper.
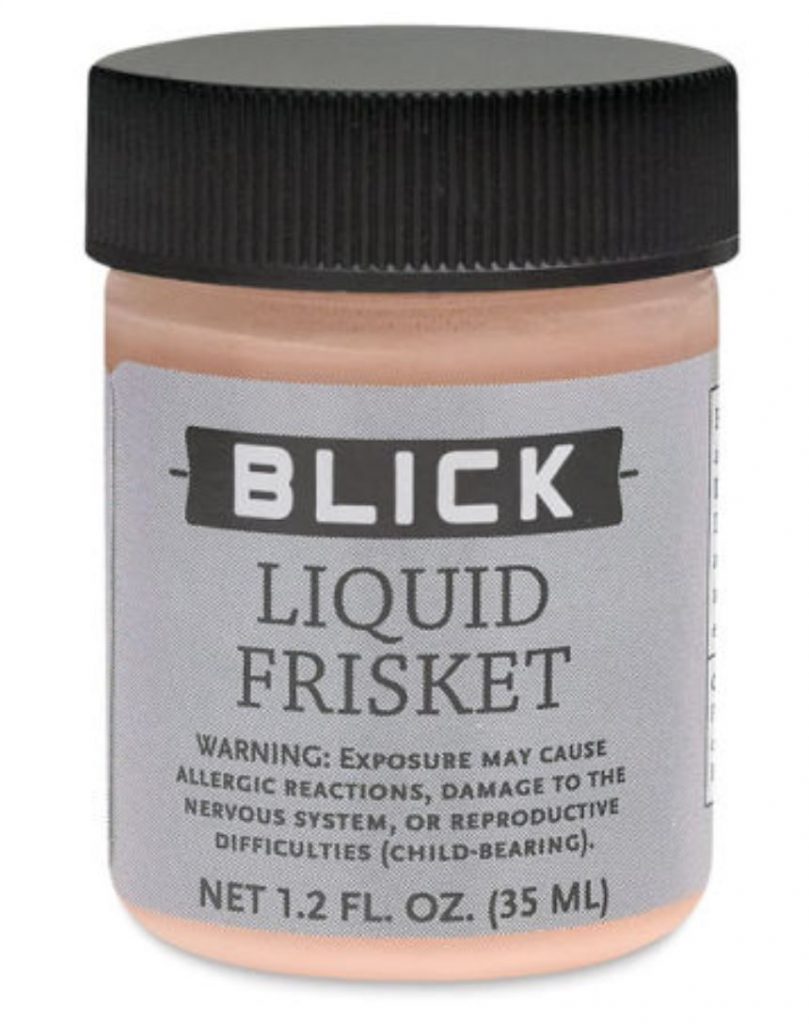
In my experiment, I used a liquid frisket from the brand Blick. Most manufacturers tint the frisket so that on white paper you can see the areas painted with frisket. Blick’s frisket is a light white-orange color and dries to a clear orange tint. The directions on the bottle recommend that the frisket be removed within 24-48 hours with a soft eraser or rubbing the frisket with your fingers.
Most frisket formulas contain latex. If your skin is sensitive to latex, you will need to wear gloves. Be sure to read all of the instructions and warnings prior to using frisket (or any solvent/chemical).
Where to buy (non-affiliated link): Blick $12.20 USD for 1.2 fluid ounces.
My experiment is fairly simple but I think it will answer some questions you may have. Some topics I was interested in learning were:
- Can frisket act like a “mask” over an area in pastel applications similar to watercolor applications?
- Will frisket be easy to remove from Clairefontaine Pastelmat? (Pastelmat is my preferred pastel paper.)
- How much frisket is needed to be effective as a barrier?
- Will frisket discolor the paper underneath it?
The setup
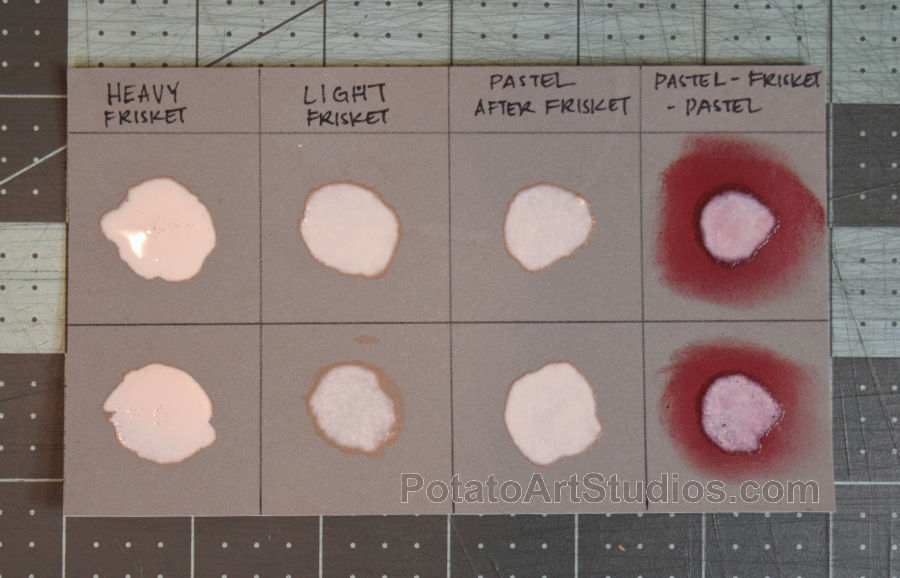
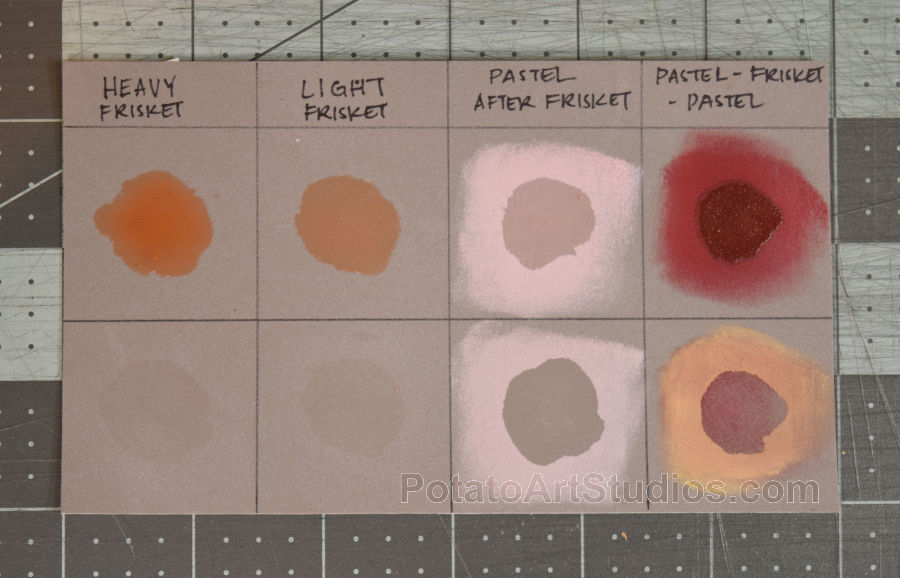
For the experiment, I applied the frisket with a synthetic flat brush in roughly 3/4 inch diameter circles onto Dark Grey Clairefontaine Pastelmat paper. For reference, each testing box is 1.5×1.5 inches.
In my testing table I have four columns: “Heavy Frisket,” “Light Frisket,” “Pastel After Frisket,” and “Pastel-Frisket-Pastel.” The first row of frisket swatches will have the frisket left untouched. The second row will have the frisket removed after it has dried to show how effective it is as a method of masking an area.
In the “Heavy Frisket” column, frisket was applied so that it pooled on the surface. This is more than twice the amount that I would normally apply in a typical application. (If my paper was upright on an easel, the “Heavy Frisket” column would drip outside of the designated box.)
In the “Light Frisket” column, I applied two light layers of frisket. This is the amount I would normally use in watercolor paintings. I applied the same two layers on the “Pastel After Frisket,” and “Pastel-Frisket-Pastel” columns.
The “Pastel After Frisket” column is self explanatory. After the light application of frisket is completely dried, one layer of pastel will be applied with a SOFFT tool blending knife. This is to test how well the frisket would work as a basic mask for an area.
The “Pastel-Frisket-Pastel” column first has a layer of red pastel applied to the surface of the paper. Two thin layers of frisket are painted. Once dried, a second layer of pastel (light yellow) is applied to the second row. This is to test how much pigment the frisket will remove if there is existing pastel on a drawing.
The testing
The right column has red pastel applied to both rows. Each square has been painted with two thin layers of frisket. The left column has an additional two layers of frisket for the “Heavy Frisket” application. This photo was taken 5 minutes after application. There is a slightly darker ring around some of the frisket swatches due to the edges drying more quickly than the center.
After 25 minutes of drying time, the right 3 columns have the frisket swatches fully dried. The frisket on the right column is noticeably darker due to the frisket interacting with the layer of red pastel. The “Heavy Frisket” column is still wet due to the large amount of frisket. The “Heavy Frisket” column required an additional hour to completely dry.
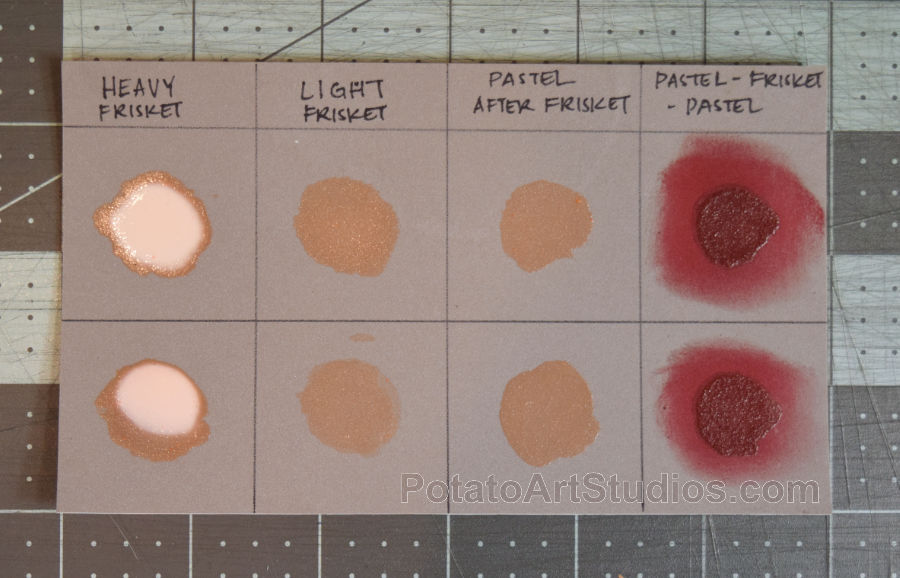
After the two right columns were completely dry, one layer of light pink pastel is applied to the “Pastel After Frisket” column and one layer of light yellow pastel is applied to the “Pastel-Frisket-Pastel” column’s second row.
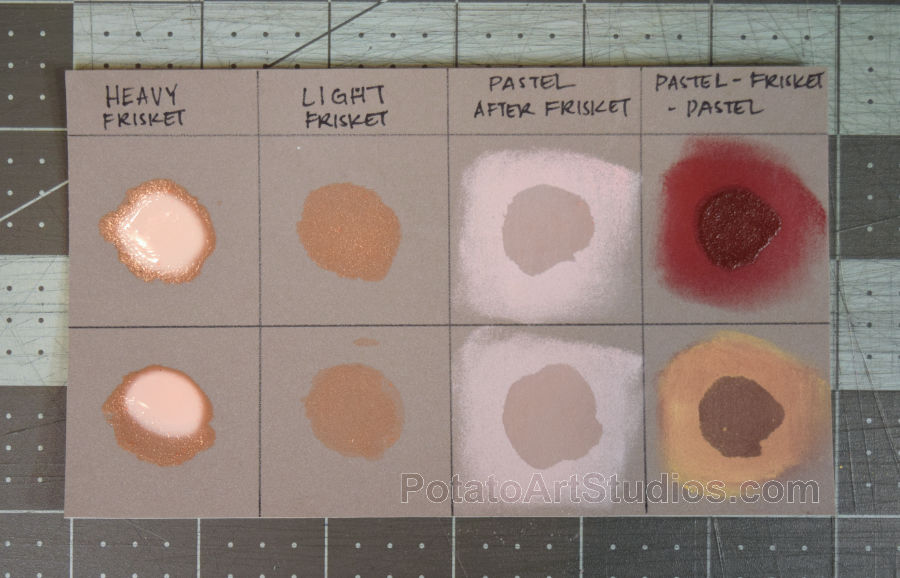
24 hours after the frisket was first applied, the frisket swatches are removed from the second row of test swatches.
Results
The “Heavy Frisket” swatch was very difficult to remove and required a lot of rubbing to lift the edge and peel the swatch away. The three other swatches were very easy to remove by lightly rubbing the surface with my index finger.
From the “Heavy Frisket” and “Light Frisket” columns, the frisket slightly discolored the dark gray Pastelmat. On different colored papers, this discoloration may or may not be noticeable. I would recommend performing a test swatch before applying frisket to your artwork.
The edges from the frisket were impressively clean for the “Pastel After Frisket,” and “Pastel-Frisket-Pastel” tests. I was worried that the frisket would leave small pieces of latex behind and be difficult to remove.
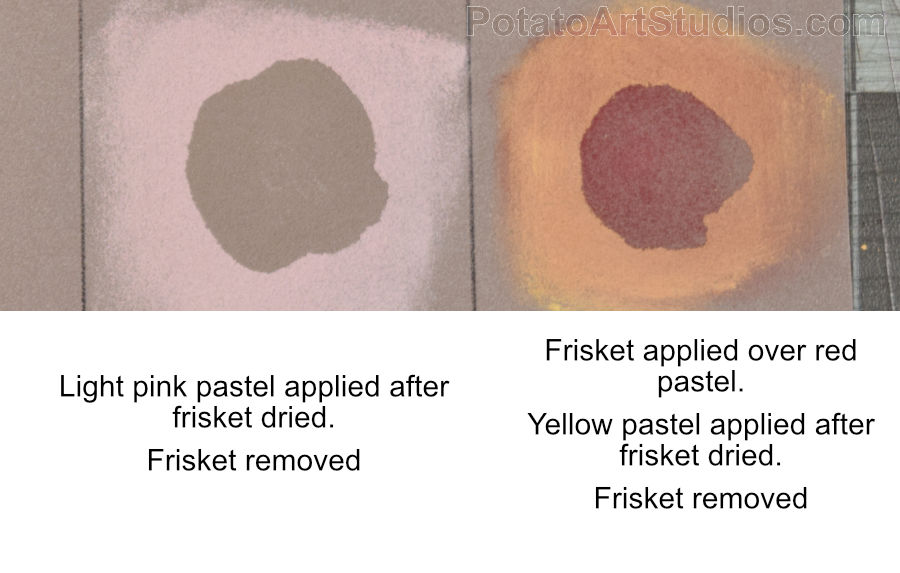
Frisket removed approximately 75% of the red pastel applied in the first layer of the “Pastel-Frisket-Pastel” test. Depending on your specific drawing, this might work in your favor as an “eraser” (or cause rework of the area under the frisket).
Conclusion
Would I consider using frisket in my pastel work? I may pull out my bottle of frisket in special circumstances. I do like the sharp edges the frisket can provide. I can see it being a good tool for subjects such as bird feathers. Two light layers seems like the perfect amount.
One concern I have is for detailed work. For small areas such as highlights on eyes or noses, it may be difficult to remove the frisket without accidentally smearing the pastel from the surrounding areas. I would recommend using a precision eraser such as a Tombow Mono Zero or paper blending stump to remove tiny areas of frisket.
While writing this blog, I also learned that frisket is also available in sheets! Frisket sheets are adhesive plastic sheets and will likely be better suited for masking/protecting larger areas. Low-adhesive and high-adhesive options are available. I have no experience with frisket sheets, but it may be worth exploring.
Let me know if you liked this mini-science art experiment in the comments. Would you consider grabbing a bottle of frisket?
-Lauren
Thank you so much for this experiment. I was wondering about this and googling it, came up with your incredibly useful post.
Hi Adrienne, Happy to hear that you found this blog post helpful. I also have used frisket in sheets (Simair Original Frisket Film) since this post and I think it’s a good alternative if you have a sharp craft knife to ‘mask’ the areas you want to protect.
Many thanks!!